Inkfox AI logoInkfox AIInkfoxAI
HomeGallery
Up to 33%Pricing
  • Home
  • Image
    • Text to Image
    • Image to Image
    • Background Remover
    • Image Upscaler
    • Merge Images
    • Background Changer
    • Photo Restoration
    • Watermark Remover
    • Virtual Try On Glasses
    • Virtual Try On Sunglasses
    • Logo Generator
    • Anime Generator
    • Coloring Page
    • Headshot Generator
    • Sticker Generator
    • Product Photo
  • Video
    • Text to Video
    • Image to Video
    • Video to Video
    • Old Photo Video
    • Hug Video
    • Product Video
    • Kiss Video
    • Wedding Video
    • Real Estate Video
    • Food Video
    • Travel Video
    • Portrait Video
    • Baby Dance Video
  • Models
    • Inkfox AI Basic
    • Inkfox AI Pro
    • Inkfox AI Max
    • GPT Image 2.0
    • Nano Banana 2.0
    • Nano Banana
    • Seedream 4.0
    • Seedream 4.5
    • Seedream 5 Lite
    • GPT Image 1.5
    • Z-Image
    • Flux 2 Pro
    • Wan 2.7 Image Pro
    • Inkfox AI Pro
    • Inkfox AI Max
    • HappyHorse 1.0
    • Seedance 2.0
    • Gemini Omni
    • Grok Imagine 1.5
    • Grok Imagine
    • Veo 3.1
    • Kling 3.0
    • Runway
    • Hailuo 02
    • Wan 2.7
    • Hailuo 2.3
    • Seedance v1
    • Kling 2.6
    • Wan 2.6
  • Gallery
  • Pricing
  • Blog
    Guides and launch notes
    Feature Requests
    Vote on what ships next
    FAQ
    Usage, pricing, and account answers
Inkfox AI logoInkfox AIInkfoxAI
How to Restore Old Photos With AI (Fix Scratches, Fading & Blur for Free)
2026/06/09

How to Restore Old Photos With AI (Fix Scratches, Fading & Blur for Free)

A practical guide to restore old photos with AI for free. Repair scratches, fading, tears, and blur, colorize black-and-white prints, and bring faded faces back.

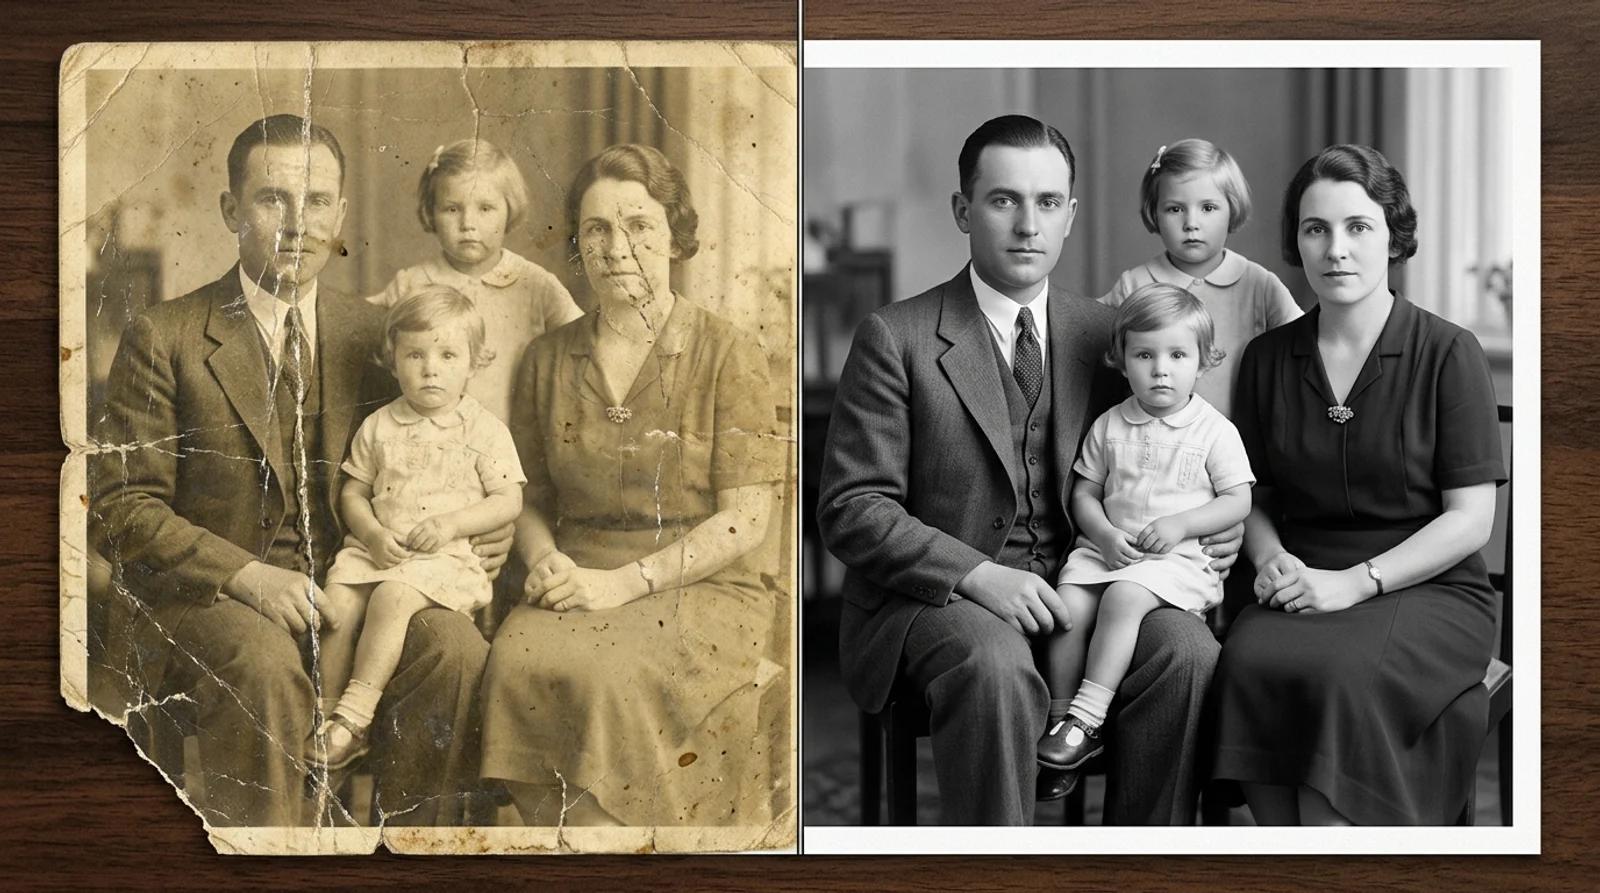
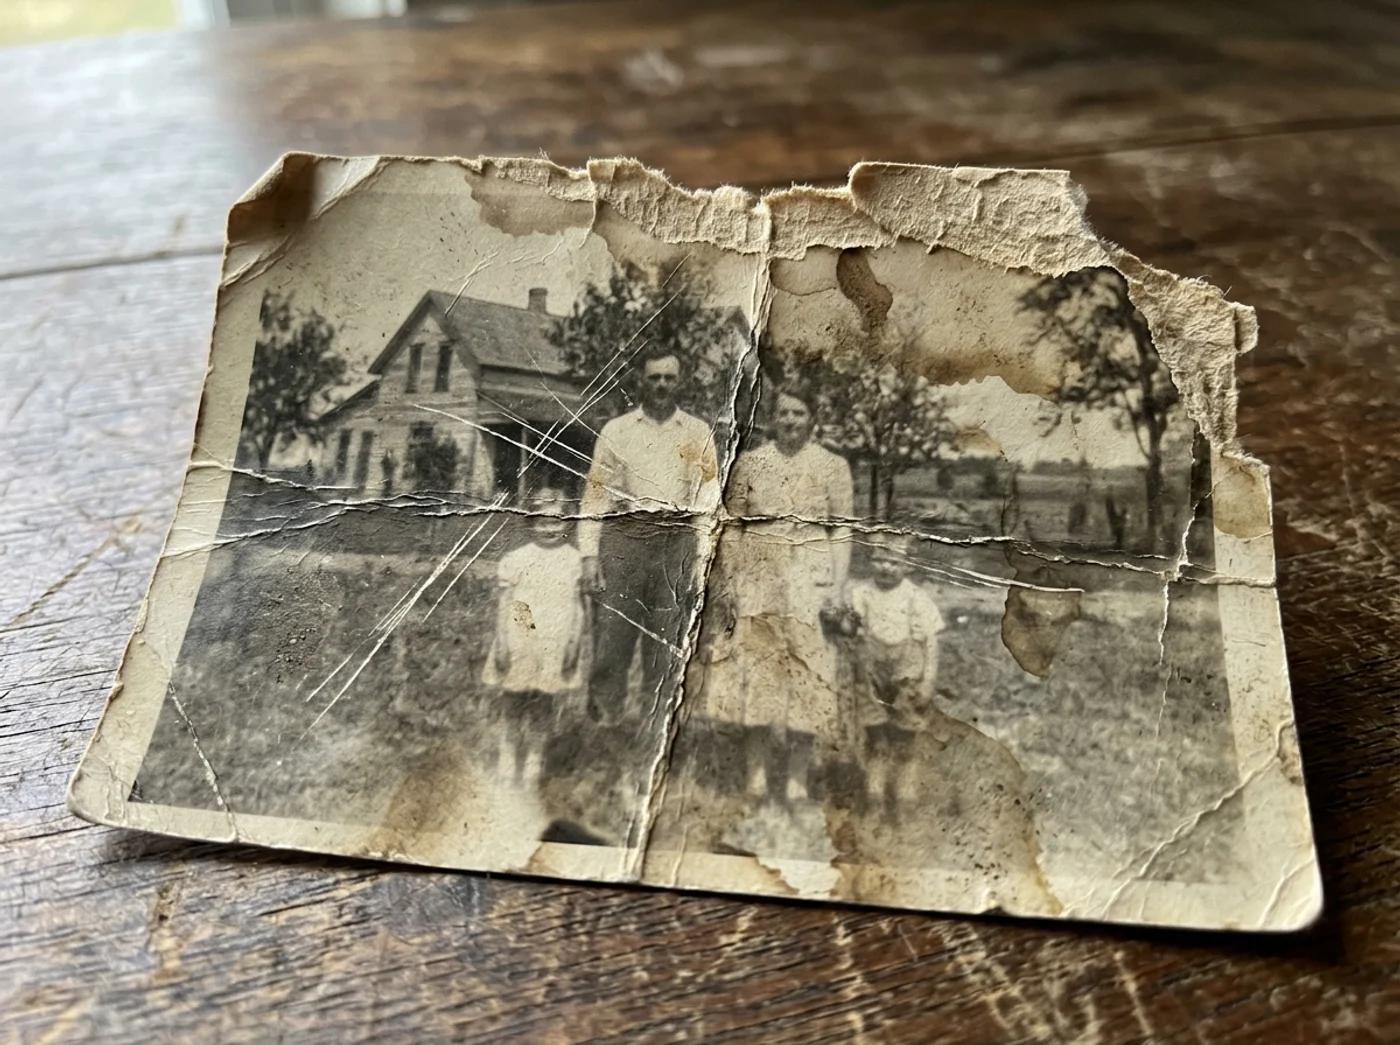
There's usually one photo in the box that hurts to look at. A grandparent at their wedding. A faded print of a house that's gone now. A curled snapshot with a crease running straight through someone's face. The negative disappeared decades ago, the people in it may be gone too, and every year in a drawer takes a little more off it. You can't reshoot the moment, so the print is all you have.

That's the gap AI photo restoration is built to close. You upload the damaged scan, and the AI clears the scratches and fading, recovers detail that's gone soft, and adds natural color in one pass, all while keeping the same faces, poses, and composition. This guide walks through how to do it well. The difference between a restore you're proud to print and one that quietly redraws someone's face comes down to a few choices you control.

A damaged, faded, scratched vintage portrait on the left and the same portrait fully restored with natural color on the right

What AI restoration can and can't fix

Set your expectations before you upload. That's what keeps you from being let down by an irreplaceable photo.

What it handles reliably:

  • Scratches, creases, and tears. Surface damage, fold lines, and torn edges clear out so the print reads clean.
  • Fading and yellowing. Washed-out, sun-bleached prints get their contrast and tone rebuilt.
  • Dust, specks, and stains. The small marks that age and water leave behind come off.
  • Mild blur and low contrast. Soft, flat areas sharpen up, and detail returns in faces and fabric.
  • Black-and-white originals. The same pass that repairs damage adds natural, period-plausible color.

What it can't do is invent detail that was never captured. If a chunk of a face or a whole figure has been torn away, the AI fills the gap with a plausible guess, not the lost content. Treat large missing areas as approximate, and review faces closely. Color is also an estimate of what was likely (skin tones, foliage, common clothing), not a record of the original hues. If you know a dress was blue, say so as an interpretation when you share, or regenerate.

The honest rule: the more real information your scan still holds, the more faithful the restore. The AI recovers detail. It doesn't resurrect what's gone.

Step 1: Scan or photograph the old print

The source sets the ceiling, and here the source is your scan of the original print. Flat, even lighting and sharp focus beat raw resolution every time.

To get a clean source:

  • Lay the print flat. A scanner is ideal, but a phone works if you keep the photo flat on a table and shoot straight down.
  • Use even, soft light. Avoid glare, hard shadows, and the reflection of a window or lamp on glossy prints.
  • Fill the frame. Get the whole photo in the shot with little empty space around it, square-on rather than at an angle.
  • Skip the cleanup filters. Don't pre-sharpen or auto-enhance. The AI works better from an honest scan than a phone-processed one.

A clean 1500px scan restores better than a dark, angled 4000px snapshot, because the AI recovers real detail instead of amplifying noise. Upload JPG, PNG, or WebP up to 10MB. If your scan is larger, export a quality-90 JPG to stay under the limit while keeping the detail the model needs.

A close-up of an old photo with deep scratches, creases, water stains, and faded areas across a portrait

Step 2: Upload and restore

Open the AI photo restoration tool and upload your scan. There's no prompt to write. The restore preset is pre-built, so you can think about the photo instead of wording instructions.

Click Restore photo. The AI reads your upload, maps where the damage is and which areas still hold real detail, removes the scratches, creases, stains, and torn edges, rebuilds missing texture from context, corrects the exposure, and layers natural color on top. It keeps the same people, expressions, poses, and clothing rather than redrawing them. This takes a few seconds.

Step 3: Compare against the original, then download

When it finishes, don't just save the first result. Pull it up next to your original scan at full size and check the parts the AI sometimes drifts on:

  • Faces. Same bone structure, expression, gaze. On clear originals, faces stay faithful. On very blurry or heavily damaged ones, the model has less to work with and may smooth or shift features.
  • Reconstructed areas. Anywhere a tear or hole crossed a face, hand, or text, look closely. That section is a guess from context.
  • Color. Skin tones and clothing should read natural, not neon or muddy.

If a face looks off, regenerate. Each run varies a little, and the second or third pass is often the one that nails the likeness. Once you're happy, download the restored image. For an irreplaceable photo, keep the original scan alongside the restored version. The restore is a new interpretation, not a replacement for the record.

Colorizing black-and-white photos

You don't need a separate step to colorize. The restore pass recovers detail and adds color in the same run, so a black-and-white or sepia portrait comes back in lifelike tone in one click.

A black-and-white portrait on the left and the same portrait naturally colorized on the right

Two things to keep in mind. The colors are the AI's estimate of what was plausible for the era (period clothing, common skin tones, foliage, sky), not a record of the original shades. And that estimate is usually convincing because it stays restrained. If a result looks oversaturated, or a color seems wrong for something you remember, regenerate and pick the more natural pass. When you share a colorized family photo, it's worth saying out loud that the color is an interpretation, especially for genealogy or memorial use where people may take it as fact.

What to expect by damage type

Different damage repairs to different degrees. Here's a realistic read on each.

Damage typeWhat to expect
Scratches, creases, and tearsCleared reliably. Surface lines, fold marks, and torn edges disappear cleanly in most photos.
Fading and color castStrong results. Washed-out, yellowed prints get contrast and tone rebuilt to look natural.
Low resolution or blurImproved, not magic. Mild softness sharpens well. A very blurry face has little real detail to recover and may be smoothed.
Black and whiteNaturally colorized in the same pass. Tones are a plausible AI estimate, not the exact originals.
Large missing sectionsApproximate. Small edge gaps rebuild convincingly. Big holes over faces or text are reconstructed from context, so review closely or crop to the intact area.

How to get the best restoration

A few habits separate a good restore from a great one:

  • Get the source right first. Flat, evenly lit, in focus, square-on. This matters more than anything you do afterward.
  • Use the highest honest resolution you have. More real pixels help, but a clean lower-res scan beats a noisy, badly lit high-res one.
  • Check faces against your memory. You know these people. If an expression reads slightly wrong, you'll catch it faster than the model can.
  • Regenerate freely. Results vary between runs. If color looks off or a face shifts, run it again and compare a couple of options before choosing.
  • For torn photos, consider cropping. If a hole sits over a face or text, restoring the intact area often beats trusting a large reconstruction.
  • Keep the original scan. Save the untouched scan next to the restore so the record survives alongside the cleaned-up version.

Free, and what signing in adds

You can upload a scan and restore it for free. Your upload is used only to generate your result, and because family photos are personal, uploads are never shown publicly. Sign in if you want to keep your restores in a private history to come back to. Otherwise, download the result and it's yours.

A quick checklist before you print

  • Source scan is flat, evenly lit, sharp, and shot square-on
  • File is JPG, PNG, or WebP under 10MB
  • Faces compared against the original at full size
  • Reconstructed areas (over tears and holes) reviewed closely
  • Color looks natural, and you noted it as an interpretation if sharing
  • You regenerated and picked the best of a couple of passes
  • Original scan saved alongside the restored version

Bring the photo back

You can't reshoot the moment, but you can give the print a second life. Start from a clean, flat scan, let the AI clear the damage and add color, then check the faces against the people you remember before you reprint or share.

Try the free photo restoration →

All Posts

Author

avatar for Inkfox AI
Inkfox AI

Categories

  • Guides
What AI restoration can and can't fixStep 1: Scan or photograph the old printStep 2: Upload and restoreStep 3: Compare against the original, then downloadColorizing black-and-white photosWhat to expect by damage typeHow to get the best restorationFree, and what signing in addsA quick checklist before you printBring the photo back

More Posts

Best Free AI Image Generators in 2026

Best Free AI Image Generators in 2026

A practical guide to free AI image generators, what free really means, and how Inkfox AI fits when you need unlimited drafts plus premium model upgrades.

avatar for Inkfox AI
Inkfox AI
2026/05/23
How to Make a Professional Headshot From a Selfie With AI (Free, No Photographer)

How to Make a Professional Headshot From a Selfie With AI (Free, No Photographer)

How to turn a phone selfie into a professional headshot for LinkedIn, resumes, and team pages with free AI: which selfie to use, how to pick a style, and how to check the result still looks like you.

avatar for Inkfox AI
Inkfox AI
2026/06/09
How to Turn a Photo Into a Sticker With AI (Free Die-Cut Stickers)

How to Turn a Photo Into a Sticker With AI (Free Die-Cut Stickers)

Learn how to turn a photo into a sticker with free AI. Pick a style, upload a pet or face, and get a die-cut sticker with a bold white border for chat packs and print.

avatar for Inkfox AI
Inkfox AI
2026/06/09

Newsletter

Join the community

Subscribe to our newsletter for the latest news and updates

Inkfox AI logoInkfox AIInkfoxAI

Free Unlimited AI Image Generator — no sign-up required.

Inkfox AI is a free AI image and video generator for text to image, image-to-image editing, reference image creation, background removal, image upscaling, text-to-video, image-to-video, and multi-model visual generation.

Company
  • About
  • Contact
  • Transparency
  • Status
Legal
  • Cookie Policy
  • Privacy Policy
  • Terms of Service
© 2026 Inkfox AI. All Rights Reserved.Sitemap